Creating load balanced HTTPS services with AWS
18/10/2017

We have a few services that support SGC. As part of some recent refactoring we ended up with most of our services on AWS. Traditionally, to make those services securely accessable to the world, I would set up a web server and reverse proxy to the app. In practice this involves configuring Apache or Nginx and managing SSL certificates. It’s not a terribly painful process, especially if you use containers, but if you are on AWS you can leverage the Application Load Balancer, AWS Certificate Manager and Route53 to help you do this. Furthermore, by using the Application Load Balancer, it’s possible to add load balancing to all your services (of course this depends on how your app is set up).
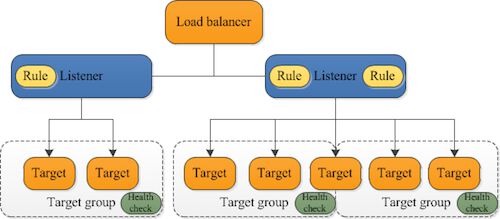
Application Load Balancers have listeners. Listeners are added to the load balancer by specifying a protocol, port and target group. A target group contains a group of EC2 instances. You create a target group manually and then can manually attach EC2 instances or setup an auto scaling group (think automatic scaling of our app).
Before we can set up the load balancer, we’ll need to setup a domain and create some certs for SSL.
First, register a domain and then create a hosted zone. Once that is done, request a certificate for your domain.
Now that the domain and certs are setup, the process to create a new service goes like:
- Setup your app on an EC2 instance
- Make sure the security group has the port open that your app requires
- Create a target group
- Select the port that your app will be running on
- Add the EC2 instance you just created
- Create a new listener on the load balancer
- Select HTTPS
- Select an unused port (check the other listeners)
- Select the cert you created earlier
- Select the target group you just created
Finally, update the Route53 hosted zone to route traffic to your ELB Load Balancer.
You should now have a fully secured HTTPS service which supports load balancing. Notice that the domain settings only need to be modified once. Every service will end up on a separate port on the same domain.
To add some load balancing you just need to modify your target group and add new targets(assuming the app is stateless). Or if you want to add some auto scaling, investigate attaching an autoscaling group.